
-Stage 5.4-
Out of The Box Geological Lessons
Over time I have come up with some innovative (I feel) ways of teaching science and geology. This is the repository of some of those ideas.
Available Geological Activities
Using Boxes to Induce Different Ways of Thinking
Demonstrating a Volcanic Eruption Using a Soda Bottle
Demonstrating Earthquake Effects Using Jell-O and Rice Krispy Treats
Demonstrating Folds using Play-Doh
Using Boxes to Induce Different Ways of Thinking
One part of science is looking at the world and picking it apart piece by piece. Why does one thing work the way it does, or how is this one part impacted by these other parts. I want you to look at the three boxes below. Which one of these boxes is not like the others? Explain your answer.
Hint: The boxes are identical, minus printing errors, so there must be something else you should be looking for.
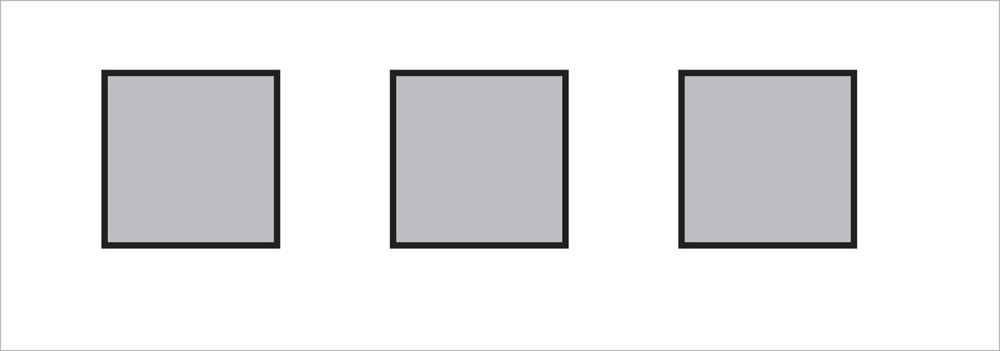
This is a first week of geology lab exercise that I use to try and induce my students to think "outside the box" and come up with alternative solutions to a problem. There are several correct answers to the above problem, but there are also many wrong answers (i.e. there is no different box). I tell them though that as long as they can explain their answer adequately enough, they likely have a correct answer.
Demonstrating a Volcanic Eruption Using a Soda Bottle
Geological Lesson
How is a magma chamber like a soda bottle? Well let’s look at what a magma chamber is. A magma chamber is an enclosed space that contains magma as well as dissolved gases. The more gas that is dissolved into the magma the greater the pressure there is on the magma chamber. The magma chamber then is sealed in some way. This is usually by a previous lava flow, providing a lava “cap” on the chamber. When this cap is removed or broken the pressure is released and the gas forces the magma out of the magma chamber producing a volcanic eruption.
A soda bottle is an enclosed space with a cap. It contains liquid soda as well as carbon dioxide (CO2) added into the mixture. When shaken up the CO2 is mixed into the soda producing higher amounts of pressure on the bottle. When the pressure is release, either through removing the cap or puncturing the bottle in some way, the gas and the soda are forced out of the bottle.
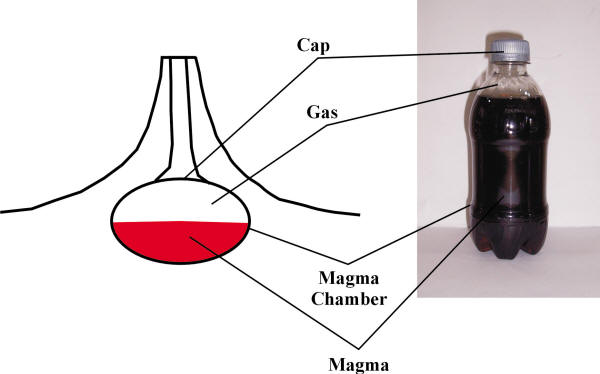
So, a magma chamber is a lot like a shaken soda bottle. The shaking produces the same effect of having the gases dissolved in the magma. Although, there have been recent studies that have shown that the number of volcanic eruptions increase the following year after a major earthquake.
Step 1: Use a small bottle of soda. Shake the bottle up for a little bit (roughly around 5 minutes). Describe the similarities between a magma chamber and a soda bottle while you are shaking this up.
Step 2: Place the bottle on the ground and puncture the cap with something. I find a Phillips head screwdriver the best. You don’t want to open the cap because then the soda will explode sideways, instead of upwards.
Here is a video of the demonstration as well.
Click below for the Demonstrating a Volcanic Eruption Using a Soda Bottle directions in pdf format.
Volcanic Eruption Using a Soda Bottle Directions
Demonstrating Earthquake Effects Using Jell-O and Rice Krispy Treats
Geological Lesson
The effects that earthquakes have on the ground, and the buildings built upon it, all depends on the ground material. Bedrock will usually move as one solid object and sediment and mud will shake like Jell-O. The reason for this is a term called liquefaction.
Liquefaction means that when shaken, unconsolidated sediments have a tendency to act more like a viscous liquid, due to water content and the fact that the individual particles are not cemented together. This means that the ground will often move around and wobble back and forth, very similar to a bowl of Jell-O that has been shaken. So in my demonstration I wanted to show my students the differences between the two substratums (rock and sediment).
.JPG)
For the consolidated sediment I used Rice Krispy Treats because the marshmallow acts similar to the binding agents in most sedimentary rocks. Jell-O, obviously, became my substratum for the unconsolidated sediments. For building materials I looked around for a while and my wife came up with the idea of cutting sugar wafers into little bricks and building little buildings with them.
Step 1: Make the bedrock. Make the Rice Krispy Treats as you normally would, following the directions on the side of the box. Then lay them out in a rather thin pan. I used a 13x9” pan.
.JPG)
Step 2: Make the unconsolidated sediment. I followed the directions for normal Jell-O on the box (quick set method) but you may want to make it like the Jigglers, which involve less water and make the Jell-O a little harder. I then set this out in a thin pan about the same size as the Rice Krispy Treat pan. You want the layer to be thin to mimic a layer of sediment.
.JPG)
Step 3: Cut up the sugar wafers into little square bricks. Then proceed to stack the bricks on each of the surfaces. I made three different building heights. They were three, four, and five bricks high set up as a square with four bricks on each level. On the Jell-O surface I found it easier to use two long bricks on the bottom to add extra support, but then I built up the remaining bricks similar the Rice Krispy Treat bricks.
.JPG)
Step 4: The next step was to shake both pans. I usually shake the bedrock pan lightly and increase in strength until the largest building falls down. I find that it actually takes quite a bit of work to get one of them to fall over.
.JPG)
Step 5: Then shake the Jell-O tray with an equal amount of force and time (as best as you can) as the Rice Crispy tray. Almost all of the buildings should fall down.
.JPG)
Step 6: Show the two comparisons side by side. This should give a good demonstration indicating the effect of similar size earthquakes on two different subsurfaces. The students also get a nice snack at the end. Although I found that the bricks absorbed the moisture from the Jell-O rather easily and made them a bit soggy.
.JPG)
Here is a video of the demonstration as well.
Click below for the Demonstrating Earthquake Effects Using Jell-O and Rice Crispy Treats directions in pdf format.
Earthquake Effects Using Jell-O and Rice Crispy Treats Direction
Demonstrating Folds Using Play-Doh
Geological Lesson
One day when I was coming up with a lesson idea for showing students what folds look when the have been eroded, I kept thinking cinnamon rolls would be awesome to show them. But they might not work right, you can't really change the folds, and it would be expensive. That's when I thought of Play-doh. Basically it overcomes all those obstacles. So here we go.
.JPG)
.JPG)
Step 1: you need Play-doh in at least 3 colors. I purchased a box of 16 and combined like colors to get enough to work with. Play-doh mixes rather well with a little work. A rolling pin and a knife. I prefer something sharp so the lines are clean.
Step 2: Roll out each of the colors. Try to keep them thick and about the same size.
.JPG)
.JPG)
Step 3: Stack the layers together.
.JPG)
.JPG)
Step 4: Trim the edges so you have a nice neat rectangle
.JPG)
.JPG)
Making sure the layers are thick enough. I found that if you roll the layers after they have been stacked to make the surface area larger causes a real big head-ache when trying to get the Play-doh apart again.
Step 5: Make your folds. I found that making a syncline with 2 anticlines on the outsides help make the plunging syncline produce the best structures. It also saves time on making different models.
.JPG)
.JPG)
Step 6: Non-plunging folds. Cut clean across the top creating nice parallel bands.
.JPG)
.JPG)
Step 7: Plunging folds. Cut at an angle across the fold. I found the best plunging syncline is produced when you cut across from the bottom corner to the top back corner as shown in the picture. The direction of plunge is down in the picture on the right. It corresponds to the right portion in the left picture.
.JPG)
Another view to show the front anticlines and syncline.
Click below for the Demonstrating Folds Using Play-Doh directions in pdf format.
Demonstrating Folds Using Play-Doh Directions
Geological Lesson
This geological lesson is to show students that some of the basics of science are about organizing information in a way that makes sense and in a way people can understand.
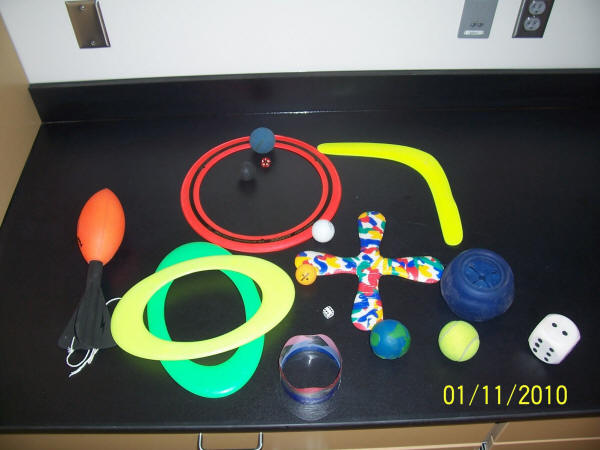
For this particular exercise I had a whole bunch of random stuff, which was all very similar to one another in one form or another. You can use whatever you have around as demonstration objects but the 16 objects I used were (pictures above) a Football thingy, an Aerobie, a Wobble thingy (the yellow and green thing) that is 2 ovals attached to each other, a Boomerang, a Roomerang (a boomerang made of foam so it can be thrown indoors), a Circle throwing thingy (I wish I knew the name of some of this stuff), a Racquetball, a Squash Ball, a Tennis Ball, a Ping Pong Ball, a Golf Ball, a My dog's ball, a Foam globe, a Giant Foam Die, a Regular die, and a 20 sided die.
The directions for this assignment are:
Step 1: In a group, organize the objects above in whatever way you feel best.
Step 2: Describe how you organized them.
When explaining the assignment afterwards, I discuss the different methods that these objects can be grouped together:
Color
Shape
Function
Material
Size
I then describe how different groups are better than others. Color and size are not good groups because the same objects can be different colors and sizes, which would place them in different groups (like the racquetball and the tennis ball above). Function is probably not one of the best groupings either because there is the possibility that you don't know the function of an object, so it gets placed in the other category (like my dog's blue ball was often placed). Shape is a good one, but is it the best one? The best one, in my opinion, is material. Because no matter the color, function, size, or shape the materials can be placed in definitive categories. This is how minerals are grouped, by their elemental components.
Overall, this lab was meant as introductory exercise to break the tension of the first day and give non-science majors small steps into the scientific mindset.
Click below for the Introduction to Science directions in pdf format
Introduction to Science Directions
